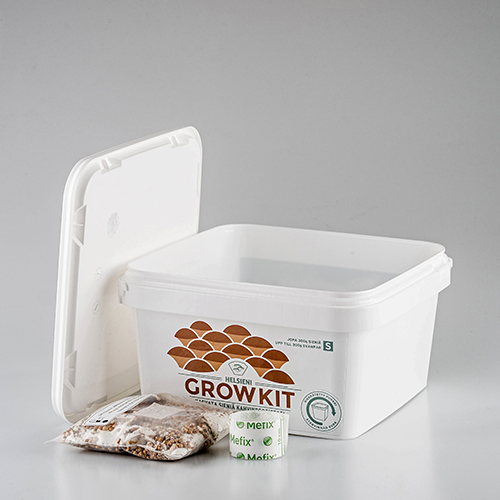
Helsieni Growkit
Grow tasty mushrooms at home on your coffee grounds!
Oyster mushrooms grow on coffee grounds and give a harvest with little effort. Don’t throw away your coffee waste but turn it into hyperlocal, fresh and delicious mushrooms.
The Helsieni Growkit includes everything you need to cultivate mushrooms on used coffee grounds: a bag of spawn, breathable tape and a reusable Growkit. You can also make your own Growkit out of any container. Then you only need the Helsieni Starter Kit which includes a bag of spawn and a piece of breathable tape. If coffee is not your thing try our Ready-to-Growkit!
Quick-start

Fill
Disinfect the kit and scissors. Add the mycelium and fresh coffee grounds. Close the kit.
Add
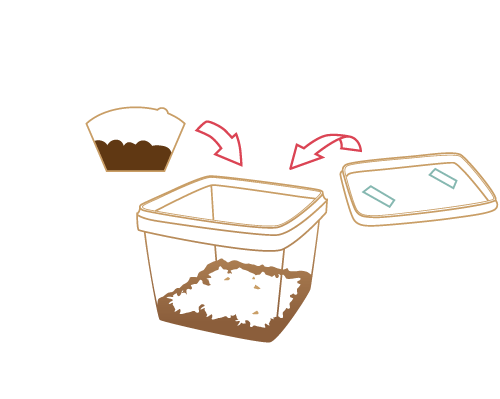
When coffee is covered in white, add new coffee. Repeat this until the container is full.

Harvest
When mushrooms pushed through the tape, mist mushrooms for 4-7 days. Harvest them by they become the whole cluster.
Instructions
I have a new Helsieni Growkit and the spawn bag that arrived with it.
I have the Helsieni Starter Kit (just the spawn bag) and I want to make my own Growkit.
I want to restart my Growkit with the mycelium that already gave me mushrooms.
I have the Ready-to-Growkit or I want to grow mushrooms in straw pellets.
Filling the Growkit
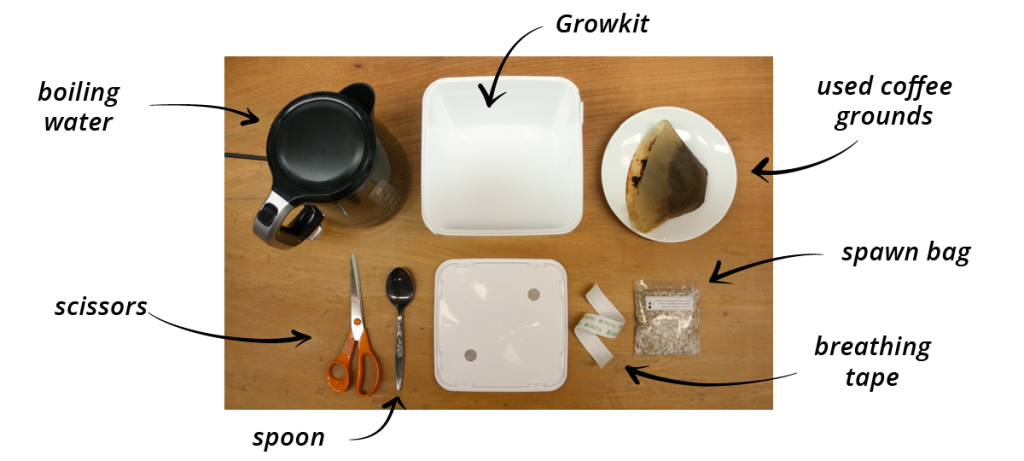
What you need to start
Did you forget the spawn bag in room temperature?
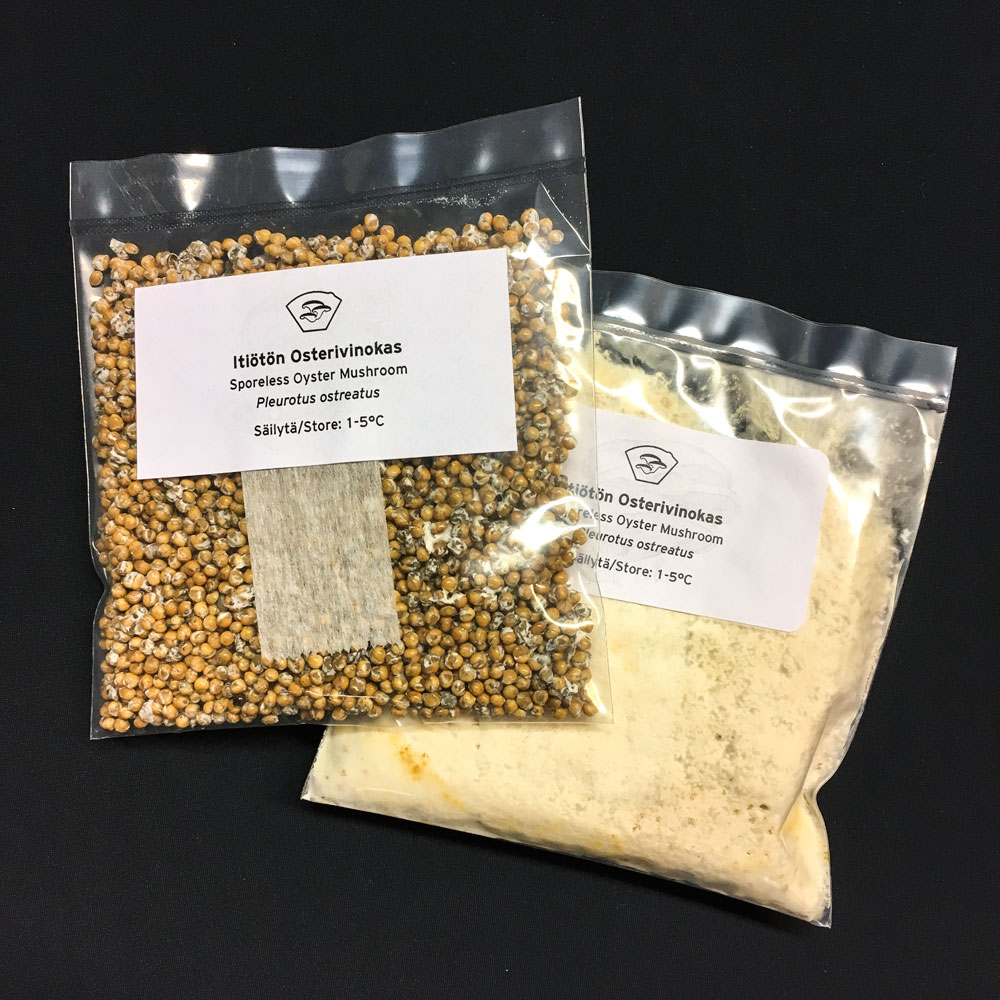
Don’t worry! Even though we recommend you to store the unopened spawn bag in the fridge it usually works fine even after weeks in the room temperature. It’s always worth a try as long as you don’t see any green mold in the bag. The bag can be stored in the fridge for some months.
Healthy living spawn can look like the bags in the photo or almost anything between those two extremes. If the spawn has grown almost solid try to break it in smaller parts before opening the bag.
1
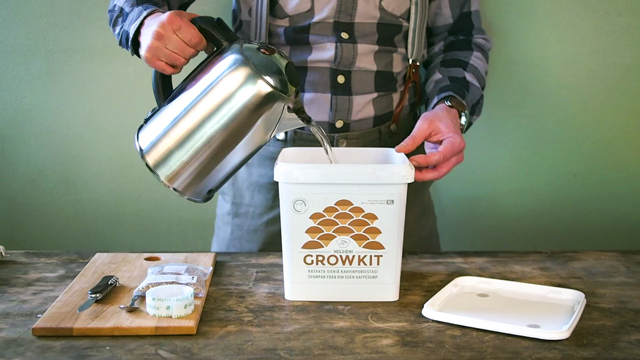
Disinfect the Growkit and the tools
Use boiling water
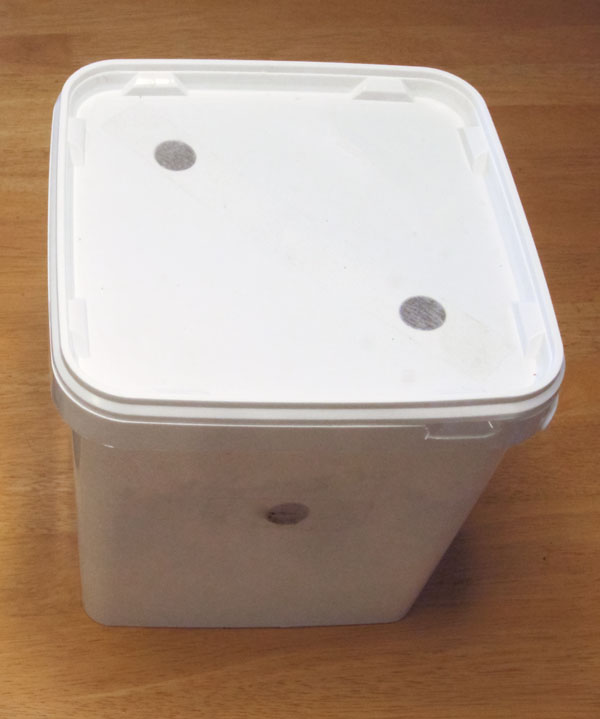
Wash your hands carefully. Be sure that all the holes of the Growkit are covered with the breathable tape. Disinfect the Growkit, its lid, the scissors and the spoon with boiling water. In this way you’ll avoid dirt and mold to contaminate your Growkit.
Do you fill your Growkit with straw pellets? Go to the straw pellet instructions

2
Mix the coffee grounds and the spawn
Use the disinfected spoon
Put 1-3 filter bags of coffee grounds that are fresh but cooled off in the Growkit. Squeeze the spawn in smaller pieces, open the bag with the scissors and sprinkle on the coffee grounds. Mix them with the clean spoon. Close the lid tightly.
Where to place it
The mushroom likes humidity and doesn’t need any light when you are still filling it up. The ideal temperature for the mycelium to grow is around 19° to 23°C. When the mushrooms start growing they need light and prefer a bit cooler temperature.
Coffee grounds
The grounds should be less than 12 h old and slightly moist: filter coffee and French press coffee are perfect. You can put also the filter into the Growkit but it may grow mold a bit more easily. Avoid using the coffee grounds from a moka pot or an espresso machine. If you wish to use them, always spray some clean water to the coffee grounds when adding new ones.
Not a coffee drinker?
You can also feed the mycelium with corrugated cardboard or straw pellets. Just disinfect them with boiling water first. Tea leaves don’t offer enough food for the oyster mushroom.
3
Add fresh coffee grounds
Feed your Growkit about every 3-5 days
In about five days the coffee grounds are covered in white fluffy mycelium. At this point it is time to add new coffee grounds. Put at most two full filter bags as in image below and close the lid properly. Do not mix.
Add freshly used coffee grounds every 3-5 days always when the mycelium has colonised the previous ones. If you add smaller amounts you can add coffee more often. Try to put the new coffee grounds always on the strongest looking mycelium.
Continue filling the Growkit until it is full up to the lid. Avoid pressing the content, though. When there is no space inside the Growkit the mushrooms will grow out of the holes.
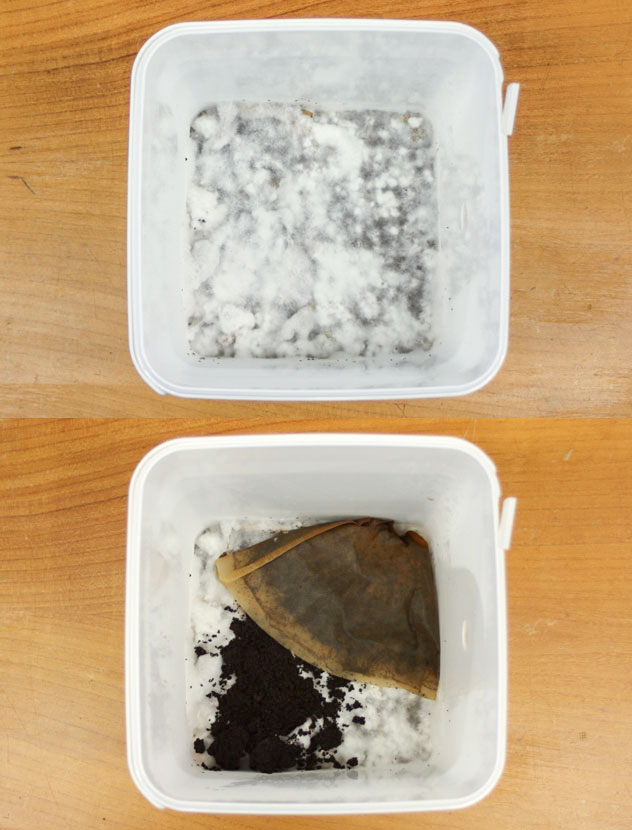

Looking good!
A healthy mycelium may look like this. Growing mycelium is usually fluffy and bright white. If you see yellow or orange liquid do not worry, they are enzymes that the mycelium uses to break down the coffee grounds.
Something is not right…
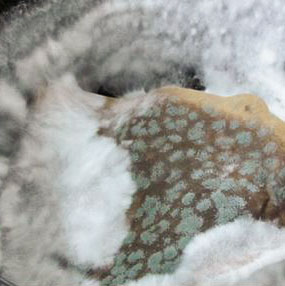
Green mold!
Green mold (also known as Trichoderma spp.) is the most common enemy of the oyster mushroom grower. Carefully remove all the mold inside your Growkit with a disinfected spoon. Add then some fresh coffee grounds. If there is a lot of green mold, empty the whole content to the biowaste or compost and start again with a new bag of spawn.
Decrease the risk of getting mold! Wash and disinfect the Growkit carefully before starting again. Add only fresh coffee grounds and handle them with clean hands. Keep the lid of the Growkit always tightly closed.
Mushrooms are growing inside of the Growkit
Usually this means that you have been waiting for too long before adding coffee. The mycelium has already colonised all the coffee and doesn’t find more food so it starts to form mushrooms. Pick away the small mushrooms and add a new layer of coffee in your Growkit. Continue adding the coffee grounds every few days until the Growkit is full up to the lid. In this way the mushrooms will not have space to grow inside the box and they will push through the holes covered with tape.

Do you have a problem you could not solve?
Contact us! We are happy to help. Just send a picture of your problem by email to info@helsieni.fi. There are many aspects to mushroom growing and there is no need to be discouraged by failures. We would like you to succeed and will gladly send you another spawn bag so that you can have another try.
When the Growkit is full
4
Cool and luminous place
But not direct sunlight
When your Growkit is full, move it to a cooler place. Mushrooms grow best at temperatures under 20°C. Colder temperatures lead to slower growth and darker colour. When growing they need a bit of light but not direct sunlight.
Don’t touch the tape. The mushrooms will push it open by themselves. If the tape is removed too early the small mushrooms may dry out.
TIP:
When the Growkit is full and healthy, you can take 3-4 tablespoons of white mycelium and start a new Growkit with it. Fill the hole you created in the old Growkit with coffee grounds. This increases the chance of growing mushrooms successfully and you do not need to wait for a new harvest for so long when you always have a new batch growing!

The Growkit has been full for a long time but there is no sign of mushrooms
Usually the mushrooms appear within 4-8 weeks from when the Growkit is full.
First, be sure that the box is full until the lid. Put the Growkit in cool and moist place for example outside on the balcony (the temperature should not go under 0°C) or in the cellar. If there are no other options you can put the Growkit in the fridge but only for at most two days.
The mushrooms need moisture to grow so you can put a plastic or paper bag lightly on the Growkit. Spray some water on the inside walls of the bag two to three times a day. This together with the cool treatment mentioned above may encourage the mushrooms to grow.

5
Keep moist
Mushrooms suffer from dry surroundings
The air in Finnish homes is usually dry. When the mushrooms start growing they need a lot of moisture to grow so it is good to spray them with water two to three times a day until they are fully grown.
You can create a moist micro climate for the mushrooms with a paper or plastic bag. Spray water on the inside of the bag. Put lightly the bag upside down on top the Growkit – all the holes should be covered by the bag – for better air circulation, you can cut a few holes in the bag. Spray more water at least twice a day.
6
Harvest
Remove the whole cluster at once
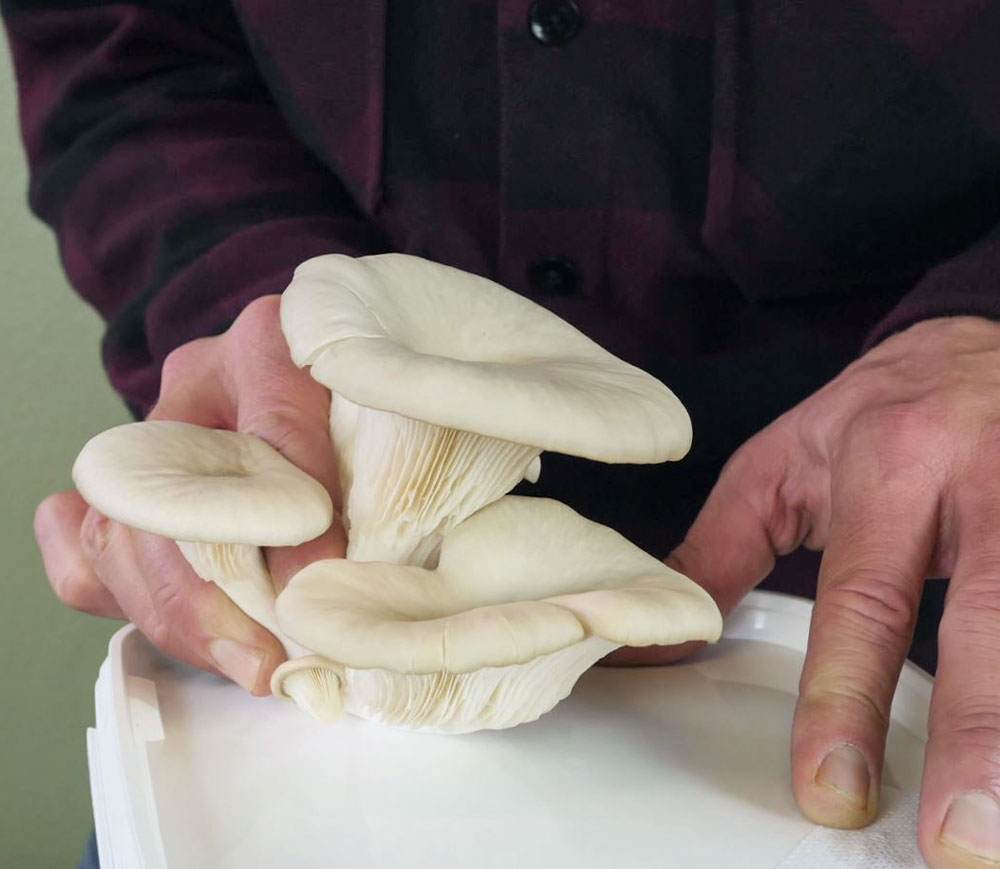
The oyster mushrooms are ready to harvest in 5-7 days. The biggest mushroom starts to open the edges of its cap horizontally. Grab the base and twist off the whole cluster.
Harvest the mushrooms latest 7 days after they have appeared regardless of their size or shape.
Now what to cook? You’ll find delicious oyster mushroom recipes here:

7
Moisten and tape again
You might get a second harvest
Cut a piece of clean breathable tape that came with your Helsieni Growkit or Starter Kit and cover the hole with it properly. Open the Growkit and add some water. The mycelium can drink about half a cup. If there are mushrooms growing through several holes, add the water after harvesting all of them. Keep moist as described in step 5 and wait a couple of weeks for another harvest.
The Growkit produces often two harvests, max three.
Be sure that the holes are properly covered with tape and that the lid is always tightly closed, otherwise you will have a risk of getting flies in your Growkit.
Restart the Growkit
Save a piece – about one fifth – of healthy white mycelium without mold from your Growkit. Cut or crumble the piece in smaller bits and moisten it. You can use it to start several new Growkits. You can put the rest into the biowaste bin or even in your garden around the plants or on the paths.
Wash the container and cover all the holes with pieces of clean breathable tape. Disinfect the Growkit with boiling water. Add the crumbled mycelium and some fresh coffee grounds and mix them or use our straw pellet refill bag. Close the lid tightly and continue filling it up like on the first round.

Growkit and straw pellets

Ready-to-Growkit
Instead of coffee grounds you can fill your Growkit with straw pellets (order refill). This way you will get the mushrooms a bit faster because the whole box is filled up at once.
Start at the Growkit instructions here but replace the steps 2 and 3 with the ones below. It is recommended to read also all the original steps to understand mushroom growing better.
You need the Growkit, oyster mushroom spawn, straw pellets, a big spoon, scissors, boiling water and a large bowl or two. The pellets multiply in volume when they get wet and you will need space to mix the swollen pellets with the spawn. Disinfect the bowl and other equipment with boiling water, except the pellets and the spawn.
2
Disinfect and moisten the pellets
Let them cool down
Put the dry straw pellets in a disinfected bowl – 20 l container is very good. Pour the boiling water on them and make sure all the pellets swell and break down. Leave the pellets to cool down in a clean space for about an hour or two. If possible, lightly place a disinfected lid on the bowl to prevent impurities from flying in.
Growkit S: 400 g pellets and 1,2 l water
Growkit XL: 800 g pellets and 2,4 l water
Refill includes 800 g of pellets.


3
Mix in the spawn and fill the Growkit
Close the lid and keep in a moist place
Break the spawn separate with your fingers before opening the bag. Sprinkle it on the cooled pellets and mix thoroughly. Put the mix into the Growkit compressing lightly while filling it up. The amount of pellets may feel too big but it will fit into the box!
Close all the edges of the lid tightly.
The mycelium grows best in around 20-24°C temperature in a humid place like in the bathroom. Growkit does not need any light until the small mushrooms start to push the tapes.
DIY Growkit
If you bought the Helsieni Starter Kit you will need to do your own mushroom growing container or Growkit. After you can start growing mushrooms with our instructions above. You can also order the growing tips by email.
Make holes
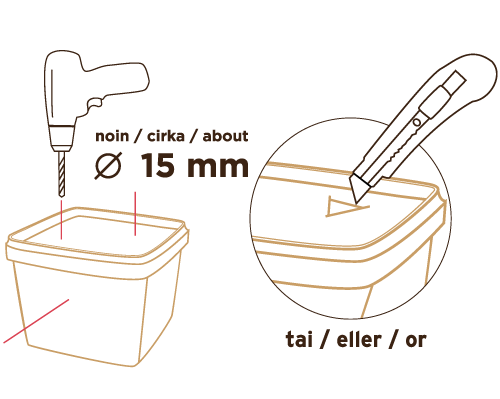
Cut or drill holes with about 1,5 cm diameter to a plastic container and its lid that can be closed tightly. Count roughly one hole for the volume of 1,5 litres.
Cut the tape
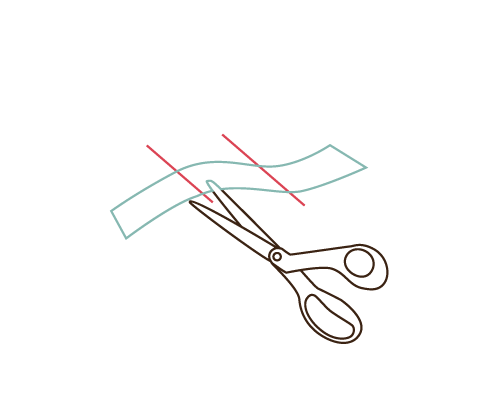
With Helsieni Starter Kit you received a length of breathable tape. Cut about 4-5 cm long snippet for each hole. You will find this tape also in the farmacies int he case you need more.

Cover the holes
Cover the holes of the Growkit with the tape. The breathable tape has to be glued on the outside surface of the Growkit. Otherwise the mushrooms cannot push the tape open.
Some examples of do-it-yourself Growkits


